Not using an SPF record for your domain yet? You are hurting your email deliverability!
Failing to set up SPF will make your emails less trustworthy in the eyes of email service providers.
And you know… untrusted emails go straight to spam! Not even the best cold email campaign could save you if you ignore SPF.
If you're sending cold emails through an Office 365 email account, we’ll help you set up your Office 365 SPF record in record time.
How to Set Up an Office 365 Record
SPF lets you decide what servers can send emails from your domain. In this case, your SPF record will authorize Office 365’s server.
To set up an SPF record, you must first obtain your email service provider’s SPF record. In this case, it’ll be the Office 365 SPF record. If you're only using your Office email account to send emails, your SPF record should look like this:
v=spf1 include:spf.protection.outlook.com -all
You must then add this record to your domain’s DNS records.
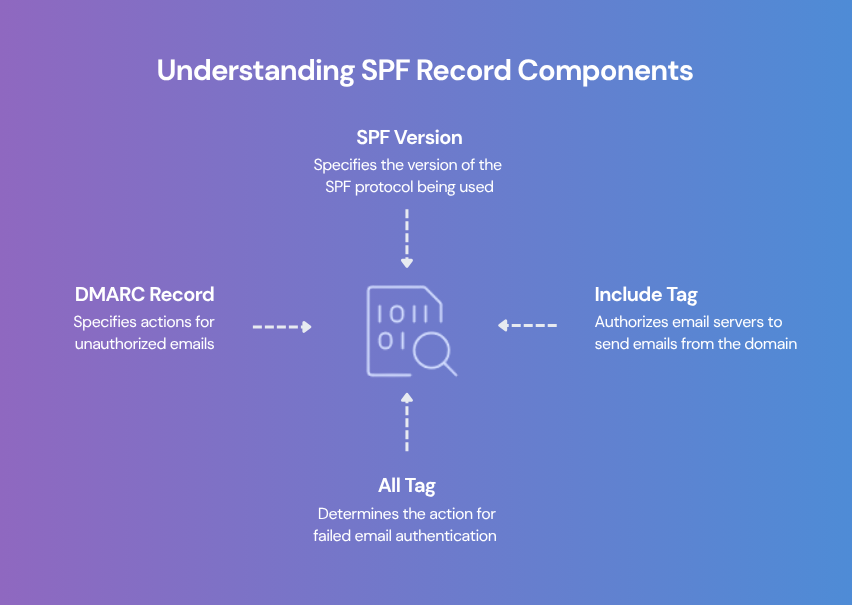
An SPF record can look complicated - Here’s a quick explanation
The v tag specifies the SPF version, in this case version 1. It’s the version that’s in widespread use.
The include tag holds the actual email server authorized to send email from your domain.
The all tag determines what result to return if emails fail authentication (when an email pretends to be coming from your domain but is sent by an unauthorized server). In this case, it’s set to “hard fail”, which is a strong signal to reject the email. What really happens to the email depends on other factors like your DMARC record (With a DMARC record, you can specify what to do with unauthorized emails).
-all means hard fail (reject unauthorized emails). ~all is soft fail (flag but allow). For stricter enforcement, use -all, but ~all may be safer during testing.
SPF Records for Office 365: What to Use in Every Scenario
✅ Microsoft 365 (Standard)
v=spf1 include:spf.protection.outlook.com -all
Use this if: You send email only from Microsoft 365.
✅ Microsoft 365 GCC High / DoD
v=spf1 include:spf.protection.office365.us -all
Use this if: You're in the Government Community Cloud High or DoD environment.
Use this if: You send email from Microsoft 365 and an on-premises mail server.
Setting up an Office 365 record for any domain
We’ll give you tutorials on how to set up your record on specific domain providers lower down the page. If your provider isn’t there, use this checklist instead:
Step 1: Log in to your domain provider account
Step 2: Navigate to DNS, DNS Management, Advanced DNS, or similar
Step 3: Check for an existing SPF record. Having multiple records complicates authentication. To recognize an SPF record, look for the version tag: v=spf1.
If you found an existing SPF record, you must add an additional include tag to it. The include tag should read: include:spf.protection.outlook.com. When done, your record should look something like this: v=spf1 include:somesendingserver.net include:spf.protection.outlook.com -all
Note: There’s an SPF lookup limit of 10, so avoid unnecessary includes.
Step 4: If your domain does not have an SPF record yet, click on Add, Add Record, or Add New
Step 5: Set the record's Type to TXT
Step 6: Put @ in the Host or Name field
Step 7: Add the Office 365 record to the Value or Target field: v=spf1 include:spf.protection.outlook.com -all
Step 8: Leave the TTL (Time To Live- server caching) to the default, or use a value between 1800 and 3600 seconds.
Step 9: Save the record
How to set up an Office 365 record on GoDaddy
Step 1: Go to the dashboard inside your GoDaddy account
Step 2: In the dropdown menu next to your username, click on My Products
Step 3: Click on the Manage button next to your domain
Step 4: Scroll down and click on Manage DNS
Step 5: Check for an existing SPF record. Look for a TXT record that starts with v=spf1.
If you've found an existing record, instead of adding the entire Office 365 record, add another include tag to it. For Office 365, this would be: include:spf.protection.outlook.com. Your SPF record should now look something like this: ****v=spf1 include:somesendingserver.net include:spf.protection.outlook.com ~all Note: There’s an SPF lookup limit of 10, so avoid unnecessary includes.
Step 6: Click on Add new record if your domain doesn’t have an SPF record yet
Step 7: Select TXT as the record's Type
Step 8: Put @ in the host field
Step 9: Keep the TTL (Time To Live - the time in seconds a server should cache your SPF record) to the default or a number between 1800 and 3600 seconds
Step 10: Save the record
How to configure an Office 365 SPF record on Namecheap
Step 1: Log in to Namecheap
Step 2: Click on Domain list
Step 3: Find your domain and click on Manage
Step 4: Go to Advanced DNS
Step 5: Check for an existing SPF record. Look for a TXT record that starts with v=spf1.
If you've found an existing record, instead of adding the entire Office 365 record, add another include tag to it. For Office 365, this would be: include:spf.protection.outlook.com. Your SPF record should now look something like this: ****v=spf1 include:somesendingserver.net include:spf.protection.outlook.com ~all Note: There’s an SPF lookup limit of 10, so avoid unnecessary includes.
Step 6: No existing SPF record found? Click on Add new record
Step 7: For the record's Type, select TXT
Step 8: Put @ in the Host field
Step 9: Add the Office 365 SPF record to the Value field: v=spf1 include:spf.protection.outlook.com -all
Step 10: Click the checkmark to save your record
How do you set up an SPF record for Office 365 on Gandi
Step 1: Log in to your Gandi account
Step 2: Go to the Domains section and click on your domain
Step 3: Navigate to the DNS records tab
Step 4: Check for an existing SPF recordLook for a TXT record that starts with v=spf1.
If one exists, do not create a new SPF record.
Instead, edit the existing record to include Microsoft’s servers. Add this part: include:spf.protection.outlook.com
Your combined record may now look like this: v=spf1 include:somesendingserver.net include:spf.protection.outlook.com ~allNote: There’s an SPF lookup limit of 10, so avoid unnecessary includes.
Step 5: Click on Edit the Zone
Step 6: Add or edit the record
In Table Mode (recommended):
Click the Add button or pencil icon to edit the existing TXT record.
Set the following fields:
Type: TXT
Name: @
TTL: 10800 (or use the default)
Value:
If new: v=spf1 include:spf.protection.outlook.com ~all
If editing an existing record: add include:spf.protection.outlook.com before the ~all
Click Save to apply the changes.
In Text Mode:
Click Edit DNS Records
Add a new line like this (or update the existing one):
@ 10800 IN TXT "v=spf1 include:spf.protection.outlook.com ~all"
Click Save
Adding an Office 365 SPF record to Cloudflare
Step 1: Log in to your Cloudflare account
Step 2: Click on your domain
Step 3: Go to DNS
Step 4: Check for an existing SPF record
SPF records are always TXT records that start with v=spf1.
If one exists, do not create a new SPF record.
Instead, edit the existing one and add Microsoft’s include:
Note: There’s an SPF lookup limit of 10, so avoid unnecessary includes.
Step 6: Add an entry - Click to add a new DNS record (or edit an existing one if needed).
Step 7: Select TXT as the record’s Type
Step 8: Add your SPF record to the Target field
If you’re creating a new record, use:
v=spf1 include:spf.protection.outlook.com ~all
Important: OVHcloud does not automatically append your domain.
In the Domain field, enter: yourdomain.com. (with a dot at the end)
Step 9: Leave the TTL to the default
Step 10: Save your record
How long does it take for my SPF record to become active?
Up to 72 hours. But the good news is that normally your record will propagate in a few hours.
You can use Mailivery’s DNS Status meter to validate your SPF record.
If you configured the SPF record correctly, the status indicator will turn green (do give it at least a couple of hours before you first check its status).
The Mailivery Starters plan includes a free 7-day trial and lets you check your SPF record status for an unlimited number of inboxes. It also offers advanced email deliverability, like AI-driven warm-up and spam and reputation analytics.
SPF Record not Working?
You might have typed your SPF record incorrectly.
A simple mistake, like an extra space, renders your record useless.
To fix this, use Mailivery’s free SPF Syntax Checker below. The results will tell you if your record’s syntax is correct.
Paste the string you added to your record’s Value or Target field, and click on Check SPF.
SPF Syntax Checker
SPF Explained
Sender Policy Framework was designed to combat email spoofing; the practice of forging the "From" address in an email to make it appear as though it comes from a trusted domain.
Not setting up SPF doesn't just hurt your open rates; your domain could also fall prey to cybercriminals looking to use email spoofing for scams and other cybercrimes.
So, how does SPF prevent this?
As mentioned, SPF lets you decide what email servers can send from your domain. Authentication will fail if an email claims to be coming from your domain but its sending server is not in the SPF record.
When authentication fails, the email may get sent to spam or get rejected outright.
Setting up an SPF is no longer optional. If you send more than 5000 emails per day, email service providers like Microsoft will now send your email to spam if you don’t have an SPF record set up.
Push Your Email Deliverability Further
With your SPF record set up, you’re one step closer to reaching your audience’s inbox.
However, you also have to set up two other email authentication methods:
DKIM (ensures emails don’t get tampered with during transit)
DMARC (Determines what to do with emails that fail authentication)
Finally, don’t forget to warm up your email.
Email warm-up is the process of gradually increasing your sending volume and frequency to establish a natural sending pattern.
This is essential because suddenly sending hundreds of emails a day without establishing a sender reputation will alert email service providers. It will make you look like a spammer!
In other words, without email warm-up, expect your emails to go straight to spam.
Try Mailivery’s advanced warm-up features with our free 7-day trial.
Need to set up SPF for a different email provider?


.png)
